::: note
学习了核心配置文件的内容,也仅仅是学习,没有实际例子来巩固的知识容易流失,本内容带你写一个简单的 demo 实例。
每次开机都手动启动 Nginx 服务?每次使用 Nginx 的指令总是要进入 sbin 目录下?本文带你配置 Naginx 服务自启和全局 nginx 指令。
:::
基础配置实例
前面我们已经对 Nginx 服务器默认配置文件的结构和涉及的基本指令做了详细的阐述。通过这些指令的合理配置,我们就可以让一台 Nginx 服务器正常工作,并且提供基本的 Web 服务器功能。
接下来我们将通过一个比较完整和最简单的基础配置实例,来巩固下前面所学习的指令及其配置。
需求
有如下访问:
http://192.168.199.27:8081/server1/location1访问的是:index_sr1_location1.htmlhttp://192.168.199.27:8081/server1/location2访问的是:index_sr1_location2.htmlhttp://192.168.199.27:8082/server2/location1访问的是:index_sr2_location1.htmlhttp://192.168.199.27:8082/server2/location2访问的是:index_sr2_location2.html如果访问的资源不存在,返回自定义的 404 页面
将 /server1 和 /server2 的配置使用不同的配置文件分割,将两个文件文件放到 /home/www/conf.d 目录下,然后在 Nginx 的配置文件使用 include 合并两个文件
为 /server1 和 /server2 各自创建一个访问日志文件
实现
准备相关文件,/homw/www 目录如下:
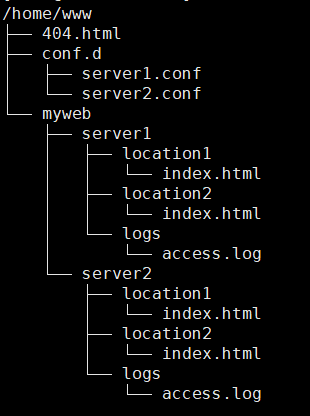
# 创建 404 页面
touch /home/www/404.html

# 创建 conf.d 目录
mkdir /home/www/conf.d

# 创建两个配置文件
touch /home/www/conf.d/server1.conf
touch /home/www/conf.d/server2.conf

# 创建 myweb 目录
mkdir /home/www/myweb

# 创建 server1 目录和其子目录以及 index.html 文件
mkdir -p /home/www/myweb/server1/location1
mkdir -p /home/www/myweb/server1/location2

touch /home/www/myweb/server1/location1/index.html
touch /home/www/myweb/server1/location2/index.html

# 创建日志目录和日志文件
mkdir -p /home/www/myweb/server1/logs
touch /home/www/myweb/server1/logs/access.log

# 创建 server2 目录和其子目录以及 index.html 文件
# 和创建 server1 步骤一样,把 1 改为 2 即可因为 Nginx 自带配置文件的备份,即 nginx.conf.default,所以我们可以直接修改配置文件,但是如果你的配置文件曾经修改过,那么请进行备份。
cp /usr/local/nginx/conf/nginx.conf /usr/local/nginx/conf/nginx.conf.backup备份后,进入 /usr/local/nginx/conf/nginx.conf 配置文件
vim /usr/local/nginx/conf/nginx.conf先清空文件,然后添加如下内容:
user www; # 配置允许运行 Nginx 工作进程的用户和用户组
worker_processes 2;  # 配置运行 Nginx 进程生成的 worker 进程数
error_log logs/error.log;  # 配置 Nginx 服务器运行对错误日志存放的路径
pid logs/nginx.pid;   # 配置 Nginx 服务器允许时记录 Nginx 的 master 进程的 PID 文件路径和名称
daemon on;   # 配置 Nginx 服务是否以守护进程方法启动

events{
	accept_mutex on;   # 设置 Nginx 网络连接序列化
	multi_accept on;   # 设置 Nginx 的 worker 进程是否可以同时接收多个请求
	worker_connections 1024;   # 设置 Nginx 的 worker 进程最大的连接数
	use epoll;   # 设置 Nginx 使用的事件驱动模型
}

http{

	include mime.types;   # 定义 MIME-Type
	default_type application/octet-stream;
	sendfile on;   # 配置允许使用 sendfile 方式运输
	keepalive_timeout 65;   # 配置连接超时时间

	# 配置请求处理日志格式
	log_format server1 '===>server1 access log';
	log_format server2 '===>server2 access log';

	include /home/www/conf.d/*.conf;  # 引用其他 conf 文件
}user www;
worker_processes 2;
error_log logs/error.log;
pid logs/nginx.pid;
daemon on;
events{
accept_mutex on;
multi_accept on;
worker_connections 1024;
use epoll;
}
http{
include mime.types;
default_type application/octet-stream;
sendfile on;
keepalive_timeout 65;
log_format server1 '===>this is server1 access log';
log_format server2 '===>this is server2 access log';
include /home/www/conf.d/*.conf;
}第 25 行代码使用 include 将 service1 和service2 的配置文件进行引用。以后无需修改主配置文件,只需要引入子配置文件即可,主配置文件作为默认值,子配置文件的内容会覆盖和主配置文件相同的内容。
进入 server1.conf 文件
vim /home/www/conf.d/server1.confserver1.conf 文件内容:
server{
  listen 8081;   # 配置监听端口和主机名称
  server_name localhost;
  access_log /home/www/myweb/server1/logs/access.log server1;   # 配置请求处理日志存放路径
  error_page 404 /404.html;   # 配置错误页面

  location /server1/location1{   # 配置处理 /server1/location1 请求的 location
      root /home/www/myweb;
      index index.html;       # 这是 server1 下的 location1 的 index.html
  }

  location /server1/location2{   # 配置处理 /server1/location2 请求的 location
      root /home/www/myweb;
      index index.html;    # 这是 server1 下的 location2 的 index.html
  }

  location = /404.html {   # 配置错误页面转向
      root /home/www;
      index 404.html;
  }
}server{
listen 8081;
server_name localhost;
access_log /home/www/myweb/server1/logs/access.log server1;
error_page 404 /404.html;
location /server1/location1{
root /home/www/myweb;
index index.html;
}
location /server1/location2{
root /home/www/myweb;
index index.html;
}
location = /404.html {
root /home/www;
index 404.html;
}
}server2.conf 文件内容:
server{
  listen 8082;   # 配置监听端口和主机名称
  server_name localhost;
  access_log /home/www/myweb/server2/logs/access.log server2;   # 配置请求处理日志存放路径
  error_page 404 /404.html;   # 配置错误页面,对404.html做了定向配置

  location /server2/location1{   # 配置处理 /server1/location1 请求的 location
      root /home/www/myweb;
      index index.html;   # 这是 server2 下的 location1 的 index.html
  }

  location /server2/location2{   # 配置处理 /server2/location2 请求的 location
      root /home/www/myweb;
      index index.html;    # 这是 server2 下的 location2 的 index.html
  }

  location = /404.html {   # 配置错误页面转向
      root /home/www;
      index 404.html;
  }
}server{
listen 8082;
server_name localhost;
access_log /home/www/myweb/server2/logs/access.log server2;
error_page 404 /404.html;
location /server2/location1{
root /home/www/myweb;
index index.html;
}
location /server2/location2{
root /home/www/myweb;
index index.html;
}
location = /404.html {
root /home/www;
index 404.html;
}
}404.html 内容:
<h1>不好意思,程序小哥正在加紧维修中 ...... </h1>重启 Nginx ,使得配置文件生效
nginx -s reload测试
如果没有关闭防火墙,记得开放 8081 和 8082 端口。
# 开放 8081 和 8082 端口
firewall-cmd --zone=public --add-port=8081/tcp --permanent
firewall-cmd --zone=public --add-port=8082/tcp --permanent

# 重启防火墙
firewall-cmd --reload打开浏览器分别访问,效果如图所示:
8081 的 server1 的 location1:

8081 的 server1 的 location2:

8082 的 server2 的 location1:

8082 的 server2 的 location2:

如果访问一个不存在的 404 请求:

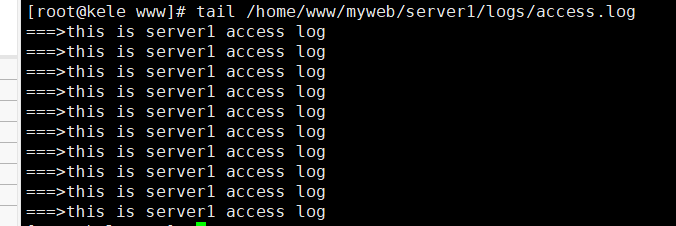
日志也会打印,这里演示一个:
操作的问题
经过前面的操作,我们会发现,如果想要启动、关闭或重新加载 Nginx 配置文件,都需要先进入到 Nginx 的安装目录的 sbin 目录,然后使用 Nginx 的二级制可执行文件 nginx 来操作,相对来说操作比较繁琐,这块该如何优化?另外如果我们想把 Nginx 设置成随着服务器启动就自动完成启动操作,又该如何来实现?
这就需要用到接下来我们要讲解的两个知识点:
Nginx 服务启停配置
Nginx 全局命令配置
服务启停配置
把 Nginx 应用服务设置成为系统服务,方便对 Nginx 服务的启动和停止等相关操作,具体实现步骤:
在
/usr/lib/systemd/system目录下创建 nginx.service 文件shvim /usr/lib/systemd/system/nginx.service文件添加如下内容:
sh[Unit] Description=nginx web service Documentation=http://nginx.org/en/docs/ After=network.target [Service] Type=forking PIDFile=/usr/local/nginx/logs/nginx.pid ExecStartPre=/usr/local/nginx/sbin/nginx -t -c /usr/local/nginx/conf/nginx.conf ExecStart=/usr/local/nginx/sbin/nginx ExecReload=/usr/local/nginx/sbin/nginx -s reload ExecStop=/usr/local/nginx/sbin/nginx -s stop PrivateTmp=true [Install] WantedBy=default.target注意:可执行文件 nginx 根据自己的路径进行修改,以及 .conf 配置文件和 .pid 文件的路径。这份内容是基于默认安装目录的。
添加完成后,如果权限有问题需要进行权限设置,没有则忽略这一步
shchmod 755 /usr/lib/systemd/system/nginx.service使用系统命令来操作 Nginx 服务
sh# 启动 Nginx systemctl start nginx # 停止 Nginx systemctl stop nginx # 重启 Nginx systemctl restart nginx # 重新加载配置文件 systemctl reload nginx # 查看 Nginx 状态 systemctl status nginx # 开机启动 systemctl enable nginx # 关闭开启启动 systemctl disable nginx
全局命令配置
前面我们介绍过 Nginx 安装目录下的二级制可执行文件 nginx 的很多命令,要想使用这些命令前提是需要进入 sbin 目录下才能使用,很不方便,如何去优化,我们可以将该二进制可执行文件加入到系统的环境变量,这样的话在任何目录都可以使用 nginx 对应的相关命令。具体实现步骤如下:
方法一:
修改
/etc/profile文件shvim /etc/profile # 在最后一行添加 export PATH=$PATH:/usr/local/nginx/sbin可执行文件 nginx 的路径根据自己的路径修改,这里是默认路径。
使之立即生效
shsource /etc/profile任意位置执行 nginx 命令,测试成功
shnginx -V
方法二:
将可执行文件 nginx 拷贝一份到 /usr/bin 目录下
shcp /usr/local/nginx/sbin/nginx /usr/bin任意位置执行 nginx 命令,测试成功
shnginx -V